
This post may contain affiliate links. Please read our privacy policy for additional information.

Why You’ll Love My Recipe
Ever wondered how to get your chicken flat like the butchers do? Well, here’s your chance, and it isn’t as hard as you might have expected.
Make sure to prepare your chicken using our Spatchcock Chicken recipe, or perhaps a Spatchcocked Baked Honey Mustard Chicken instead. Serve your chicken with some Make Ahead Mashed Potatoes or Air Fryer French Fries and your favourite veggie side dish.
Reader Review
Love your recipes!!! I print many of them twice!!! One for home & one for our cabin at the lake.
I bought Two of your cook books & am enjoying pouring through them.
My family thanks you for many delicious meals!!

Karlynn’s Recipe Notes
- Skill Level: This method requires precision and some strength.
- Total Time: As long as your shears are sharp, this should only take a few minutes.
- Variations: Since this is a preparation method rather than a recipe, variations don’t really apply. Once your chicken is spatchcocked, you can add whatever seasonings, sauces, or marinades you’d like.
- Tools Needed: For this process, you’ll need a pair of sharp poultry shears or some strong kitchen shears, and a large tray or baking sheet to lay out the pieces. If you have a knife sharpener, make sure you use it to sharpen your shears.

How To Spatchcock a Chicken
As you can see, there is no ingredients list here. Since this is a method rather than a recipe, there is also no recipe card attached to this post. Simply follow the step-by-step instructions below.

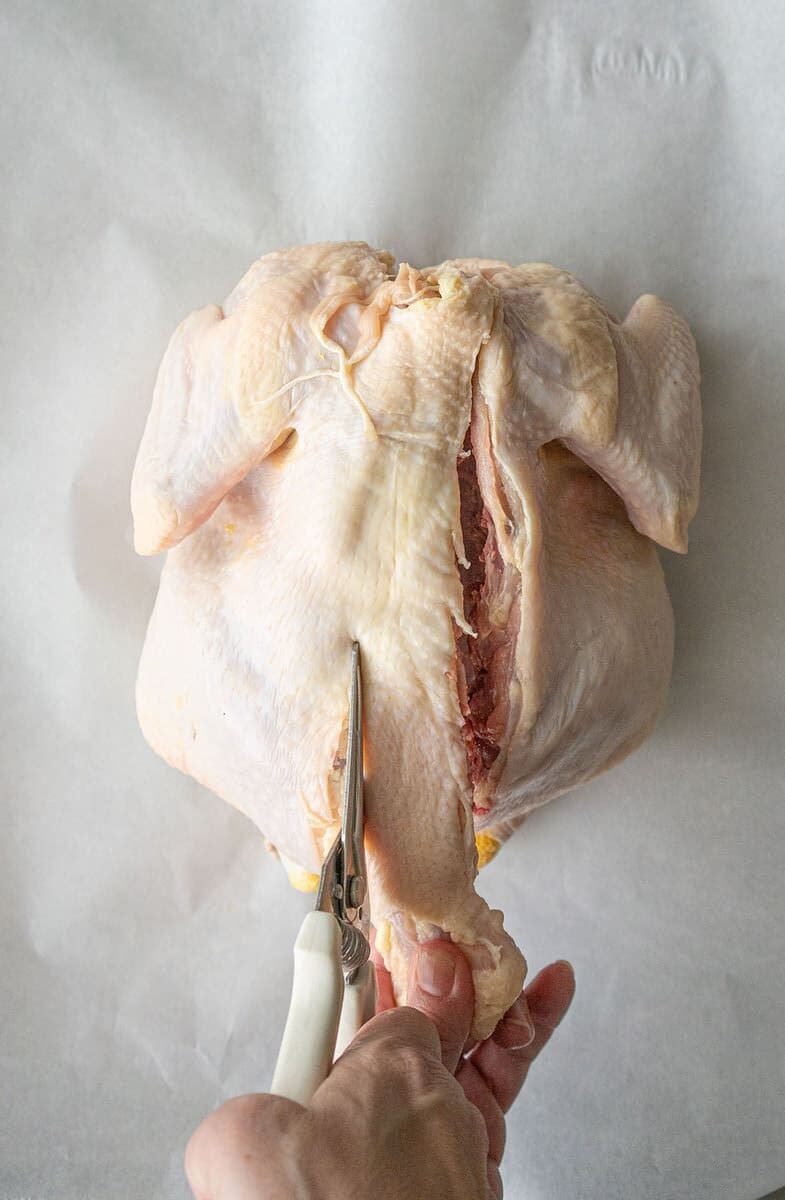


- Step 1, Make the Cut: With sharp poultry shears or kitchen scissors, cut along one side of the chicken spine with firm, stiff cuts. It will be a bit challenging at first, but as you start to cut through, it will get easier. Cut all the way along the spine, making sure to cut through any small bones or bits of cartilage that you find as you go through.
- Tip: To help guide your shears, grip the tip part of the chicken that sticks out of the rest of the carcass – this is actually called the chicken’s rump.
- Step 2, Mirror the Cut: Once you’ve cut all the way along one side of the spine, start doing the same thing on the other side of the spine. As you did with the first side, cut all the way down the spine using your shears with firm, determined cuts until you reach the very end.
- Note: This cut will be a bit harder because you won’t have as much stability while gripping the chicken as one side is already broken away. Take care not to cut yourself on any of the sharp exposed rib bones.
- Step 3, Peel Away the Spine: Once you’ve cut all the way down the spine on both sides, grip the spine firmly with one hand and peel it away from the carcass.
- If needed, use your shears to sever any fat or cartilage, so that you don’t hurt yourself trying to remove the spine.
- Step 4, Break the Breastbone: Flip the chicken over so that the breasts are facing up and place your hands over one another right where the two breasts meet.
- Using firm, downward pressure (almost like you are giving CPR) push down on the chicken. You should hear the breastbone audibly snap and separate, and the chicken should now be laying flat.
- Step 5, Lay Out Your Spatchcocked Chicken: Now, you’re all done! The only thing you need to do is to lay your Spatchcocked chicken on a sheet pan and top it with your favorite seasonings and other ingredients to make a great roast chicken.
Karlynn’s Tips and Tricks for Spatchcocking Chicken
Keep The Scraps: Don’t throw that spine away when you’ve ripped it out. Use it as a base for chicken stock or gravy to add a ton of rich, savory chicken flavor and plenty of gelatin as well. Or set it aside in a baggie or container for when the entire carcass is picked clean and make some Crock Pot Bone Broth.
Servings Suggestions: Try using a delicious herb butter, like in this recipe for Spatchcock Chicken, to help ensure that your chicken cooks evenly and comes out deliciously tender and flavourful. Or make a marinade like The Best Chicken Marinade or Barbecue Grilled Chicken Marinade to saturate the chicken in delicious flavours. Add some potatoes or other root veggies alongside the chicken, or serve it with your favourite rice or pasta.

Storage Instructions
Fridge: If you aren’t going to be using your spatchcocked chicken immediately, you can store it in the fridge for one or two days. Depending on the kind of treatment you’ll be giving it, you can leave it uncovered to dry out the skin, cover it to keep the moisture in, or get it marinating.
Freezer: If you don’t nee to use your chicken immediately, you can put it in an airtight and freezer safe bag or container and freeze it for up to 3 months. Consider marinating or seasoning it before freezing it, so that you have a flavourful chicken to cook later.
Other Delicious Chicken Recipes
Looking for ways to prepare that chicken?
Try this Mushroom Soup Chicken & Rice Casserole for a meal all in one dish.
Want something a bit different? Try this Chicken Piccata.
Don’t feel like going to the effort to spatchcock a chicken today? No problem. Just make Roast Chicken instead.
There you go, everyone. I hope this helps inspire you to try spatchcocking a chicken.
Happy Cooking!
Karlynn

Spatchcock Chicken
Ingredients
- 3-4 pound chicken, spatchcocked -back spine removed with kitchen shears and laid flat
- 1 cup butter, softened
- 5 garlic cloves, minced
- 2 teaspoons poultry seasoning, finely chopped
- 2 teaspoons rosemary, finely chopped
- 1 tbsp parsley, finely chopped
- ½ teaspoon salt
- ½ teaspoon black pepper
- 4 large potatoes , washed and diced into cubes
More Vegetable Options
- 3 medium carrots , washed and sliced
- 2 medium white onions, peeled and quartered
- 1 pound white mushrooms, washed and sliced in half
- 6-7 whole garlic cloves, peeled
Instructions
- Preheat your oven to 400 °F.
- Combine the butter and all of the herb ingredients in a small bowl until everything is mixed together well.
- Place the chicken breast side UP on a large rimmed sheet pan.
- Spread 1/3 of the butter mixture under the chicken breast skin.
- Dot another 1/3 of the mixture over top of the chicken.
- Place prepared vegetables all around the chicken on the sheet pan. Melt the remaining 1/3 of the butter mixture and then drizzle over the vegetables.
- Bake uncovered at 400˚F for 45 min or until instant read thermometer reads 165˚F when inserted into thickest part of chicken breast OR even better, when it reads 185 °F in the thickest part of the thigh meat.
- Remove the sheet pan from the oven.
- Let the chicken rest for 5 minutes, then remove the vegetables and place in a bowl.
- Remove the meat from the chicken if desired, or cut into quarters and serve.
Notes
- We had potatoes with our chicken, but you can use any of the vegetable options above in the ingredients list. Just make sure to dice them into a size that will roast in 45 minutes!
Nutrition
Nutrition information is automatically calculated, so should only be used as an approximation.


Kay says
Love your recipes!!! I print many of them twice!!! One for home & one for our cabin at the lake.
I bought Two of your cook books & am enjoying pouring through them.
My family thanks you for many delicious meals!!