
This post may contain affiliate links. Please read our privacy policy for additional information.

Why You’ll Love My Recipe
These hand pies are a delicious and easy treat for the whole family, and they can be made over a campfire with minimal oil.
While you’re at it, try some camping-friendly Campfire Chili Cheese Fries or a Chili Coconut Scallops Campfire Dinner. And once you’re back home, why not try these Whoopie Pies for another type of sweet treat?
Reader Review
I made these ahead of time and put them in the freezer. I used Blackberry pie filling instead. I didn’t make them until the second day of camping. I took them out of the freezer in the afternoon and put in the fridge until I was ready to cook them. We converted our Sprinter and installed a mini fridge with a small freezer compartment. It comes in handy. I ended up using my Dutch oven. They came out perfect !! I’m so excited at finding this. Thank you for sharing this. My husband and I devoured them.
Karlynn’s Recipe Notes
- Skill Level: This is an easy recipe.
- Total Time: You can have these made in under 10 minutes.
- Variations: Try this method with any fruit-based pie filling. It should also work with your favourite jam as long as it’s not too runny. You can use your own homemade pie crust dough if you prefer, though it may fry a bit differently. Try mixing some chocolate chips or nuts, even a dollop of marshmallow fluff. Mix up some cinnamon sugar for dredging your cooked pies in.
- Tools Needed: For this recipe, you’ll need a measuring cup, a drinking glass, a medium bowl, a spoon, a cast iron skillet, a can opener, a fork, some paper towel, and a set of tongs.
What You’ll Need For Ingredients
Crust: You can make these hand pies with refrigerated dough from the store, try this Tenderflake Pie Crust recipe, or try it with whichever pie crust recipe you normally use. You may want to have a bit of flour on hand in case your dough gets too sticky while you’re handling it.
Filling: While this recipe calls specifically for cherry pie filling, you can use any fruity filling. This probably wouldn’t work well with something smooth like pumpkin pie filling though. Stick to nice, chunky canned fruit fillings or toss some fresh fruit in sugar and cornstarch and try that.
How to Make Campfire Hand Pies
This is a brief overview of the recipe. The full list of ingredients and step-by-step instructions are in the recipe card below.
- Roll out pie crust and cut circles out with a water glass or a 2-3 inch round cookie cutter. Roll out dough again and cut more circles until you’ve run out of dough.
- Add filling to the center of each circle if you plan to fold them over and pinch the edges together like a dumping. Or put filling in the center of half the dough circles and place the other circles on top. Press edges together with the tines of a fork.
- Pour 1-2 inches of oil into skillet. Heat until sizzling.
- Cook 1 or 2 pies at a time, letting them brown on one side and then turning them over.
- When both sides are browned, put the hand pies on some paper towel to absorb any extra oil. Dredge in sugar if desired.
Karlynn’s Tips and Tricks for Making Campfire Cherry Hand Pies
Hot Oil: Even though you don’t need a large amount of hot oil for this recipe, please observe the safety rules you normally would if there are children or animals nearby. No one likes grease burns. You’ll also need to make sure that the oil is hot enough before putting the hand pies in, so that they don’t just sit and absorb cold oil.
Waste Not: Once your oil is cooled back down, as long as it’s not too dirty, you can store it in a sealed container for future use. This may be especially useful if you’re planning to fry more things on your camping trip. And don’t be afraid to fry any dough scraps that didn’t make it into a hand pie. Toss the fried dough in the same sugar (or cinnamon sugar, for an extra special treat) that you dredged the hand pies in.

Storage Instructions
Since this is a campfire recipe, you may only have a cooler with you. Don’t worry, because these hand pies should be absolutely fine without refrigeration, if they even last more than a few minutes. If you happen to be camping in an RV or a vehicle with a fridge, you can store the cooled hand pies in a sealed container in the fridge. Reheat them in a skillet, or an air fryer, depending on what you have access to.
More Delicious Recipes
Looking for more tasty pie recipes?
Try this Strawberry Blackberry Pie with some Strawberry Whipped Cream.
Make a Classic Apple Pie or Caramel Apple Pie to go along with your favourite vanilla ice cream.
Or try some Pecan Pie Bars for another handheld option.
There you go, friends. A customizable and easy treat that you can make at home or while camping. Try it out and let me know what you think.
Happy Cooking!
Karlynn

Campfire Cherry Hand Pies
Equipment
- 1 cast iron pan
- 1 roll of paper towels
Ingredients
- 1 package of pre-made pie crusts, not in a pie plate (has two pie crusts per package)
- 1 can cherry pie filling
- ¼ cup white sugar
- ½ cup vegetable oil , approximate, for frying
Instructions
- Roll out the pie crust and cut out circles using a water glass. The circles will be around 2-3 inches wide. Gather together the crust and roll out again to the original thickness of the pie crust ( you can use that water glass! That’s what I did!) and cut out some more circles. Repeat until you have as many circles as desired!
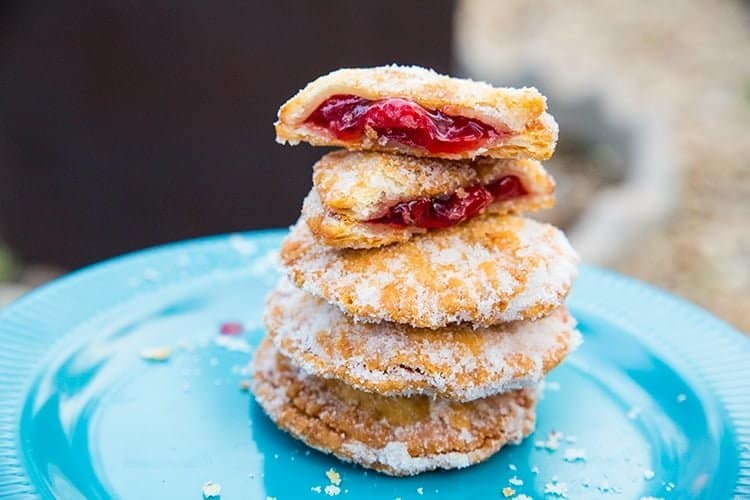
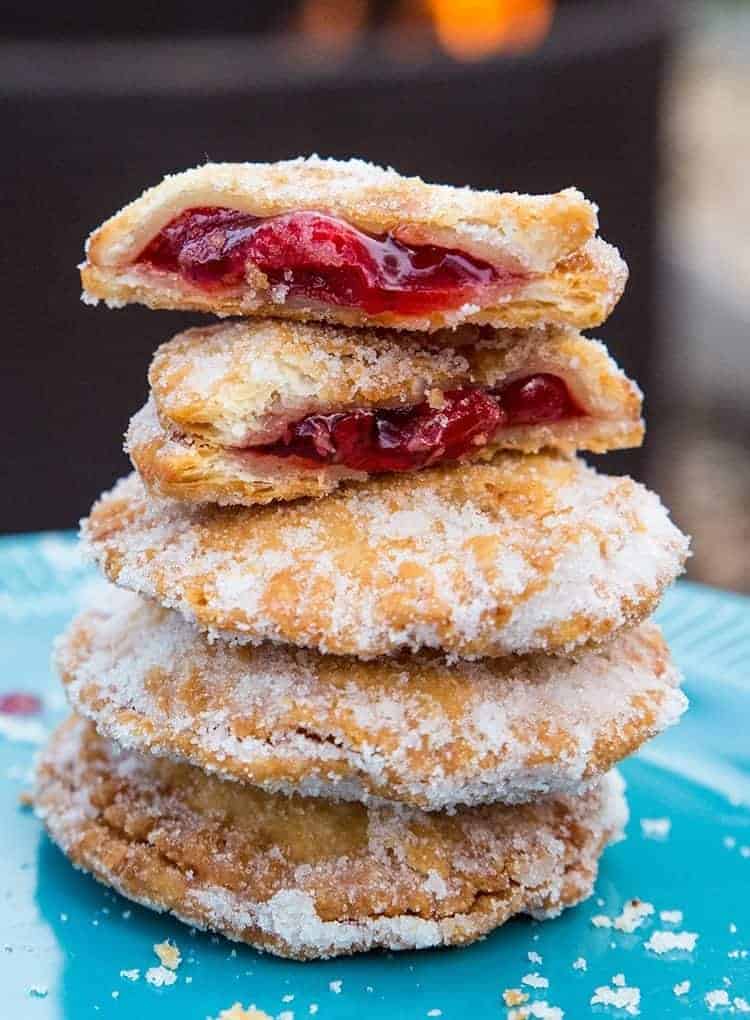
- You have two options to make these : you can use one circle and pinch them into a moon like a perogy OR you can use two circles and make them into a round ravioli shape. The ones I made in the photos use two circles.
- Place one circle down and place 1 heaping tbsp of cherry pie filling into the center. Place another crust circle on top and using the tines of a fork, press the edges together all the way around. Gently turn over and repeat, sealing the pies edges on both sides with the fork. ( This method works beautifully, I had no leaks!)
- Place 1-2 inches of oil in a cast iron pan and place on the fire over coals, not direct flames. Heat the oil until it sizzles instantly when water droplets are dropped into it.
- Place 1-2 pies into the pan and cook until the first side is well browned. Take your tongs and turn each of them over.
- Once the other side has been browned, remove and drain on paper towels.
- If wanted, dredge the pies through white sugar after they have drained on the paper towels.
- Serve and enjoy!
Notes

Nutrition
Nutrition information is automatically calculated, so should only be used as an approximation.


Anna says
I made these ahead of time and put them in the freezer. I used Blackberry pie filling instead. I didn’t make them until the second day of camping. I took them out of the freezer in the afternoon and put in the fridge until I was ready to cook them. We converted our Sprinter and installed a mini fridge with a small freezer compartment. It comes in handy. I ended up using my Dutch oven. They came out perfect !! I’m so excited at finding this. Thank you for sharing this. My husband and I devoured them.
Christina Warren says
Can I deep fry these?
Kelly says
Just made these BUT used apple pie filling and fried them at home on the stove. So good!
Googie says
Hi! Just an idea if you want to calculate the caloric value of the absorbed oil. Just weigh the cooled oil after you’re done cooking pies, divide by number of pies, and multiply by calories per gram or whatever for the oil.
Of course it’s not super important! I mean, we’re eating these pies.
Murray says
Just great. Was out camping so picked Saskatoon berries and made a cornstarch glaze and filled pockets was just great
Michelle says
Do you think I could pre make these at home and freeze them and then make them over the fire at the campsite (tent camping is oh so fun!??)
Lori Spaidal says
We have cast iron pie irons that we use for many meals(chili cheese pies, and pie filling pies), We use them when we are camping or on the BBQ. Check them out!
dp says
Can you be more specific when you call for “1 small can of cherry pie filling” TY
Tim says
The pies look great. Can’t wait to try them, but what’s a “perogy”?
Connie Harris says
THIS RECIPE LOOKS DELICIOUS. CANT WAIT TO TRY IT ON OUR UPCOMING CAMPING TRIP. WILL LET YOU KNOW HOW THEY TURNED OUT,
Jess says
These sound amazing! 🙂
I would love for you to share this with my Facebook Group for recipes, crafts, tips, and tricks!