This post may contain affiliate links. Please read our privacy policy for additional information.
The devil made me do it. She forced me to make fried pies.
The devil lives in Houston Texas, used to roller skate to bad 70’s music, writes a blog I love to read and we talk on Twitter a lot.
Her name is Jeanne.
She’s ruined my waistline forever by guest posting and teaching me how to make fried pies.
Well, to be honest merely being a food blogger ruins your waistline, but that’s another post entirely.
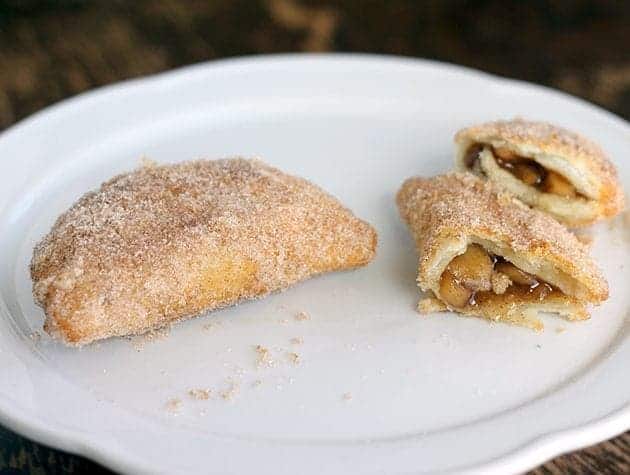
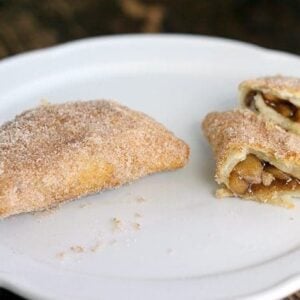
Ever since the devil Jeanne sent me her amazing Apricot & Marmalade Fried Pies I have not stopped thinking about making an apple version. We western Canadian’s are very familiar with the restaurant A&W, who makes the best deep-fried apple pies. Covered in sugar, they are a favorite treat of mine, so I knew that I had to copy them as close as possible.
These are the devil’s handiwork themselves. Yikes. I never should have made these. Now I am doing a little experimenting, with freezing the filling and the dough to see if this is something that you can pre-make then pull out for a party. I wasn’t sure how the filling was going to freeze and defrost, so I’ll get back to you on that.
Apple Pie Filling
3 cups of diced Granny Smith apples
1/2 – 3/4 cup of water
1/2 cup brown sugar
1 1/2 tbsp corn starch
1 tsp cinnamon
1/4 tsp salt
dash of cloves
dash of ginger
1/4 tsp vanilla
Your Choice of Pie Pastry
I used my grandma’s recipe, which I aptly named Chicken Grandma’s Egg-Vinegar Pastry. The recipe is forthcoming, but if you are serious about trying this recipe as a beginner, don’t use it. This is a very, VERY flaky pastry so my pies were incredibly delicate. I would suggest using The No Excuse Pie Dough from Comfortably Domestic for your first time around. That dough holds up better and ever though mine were great, the dough is delicate.
To make the filling, combine everything together in a pot and place on medium-low heat on the stove. I wanted to dice my apples in nice little squares to allow for smaller pies. You also want to use a tart, sturdy apple in this.
Start with a 1/2 cup of water as you may like your apples crisper for the end result, you can always add a little more for simmering later on. You are going to cook this mixture until the apples are the right texture for your personal taste. This took around 20 minutes for mine.
Remove from the heat and cool.

Prepare your dough and roll out to the usual 3 mm thickness.
I used a 4 inch cutter for this and it was just right, a wee bit larger than bite size and not quite dessert size. Actually I lied, with vanilla ice cream added this is a perfect dessert size!
Jeanne sums it up far better than I ever could, so from her post:
- A perfect dessert size would be about a circle about the size of a salad plate. To make fried pies this size, simply lay a salad plate, saucer or bowl on your rolled dough and use a sharp paring knife to cut out circles of dough.
- A more petite snack size would be a circle about 3” in diameter. For this, I have a metal biscuit cutter I use. If you don’t have a biscuit cutter, save a metal vegetable or bean can the next time you empty one. Just remove both ends of the can once it’s empty, remove the label and wash thoroughly. I keep a few of these in my utensil drawer – from small tomato paste cans to larger vegetable cans. They make great biscuit & cookie cutters, and when they wear out, you can toss them and make another.
- If you’re really feeling frisky, you can cut your dough into squares which will make nice triangle fried pies when they’re finished. I like a nice triangle-shaped fried pie when I want to kick it “old school” like my Texas grandmothers did. A 6” square is a good starting point.
Place a decent tablespoon of filling onto your dough circle, you have to leave 3/4 ” to 1 ” of an edge to be able to seal this properly.

Seal the edges by folding the dough over the filling, pinching together, making sure you use a little water on your fingers to wet the seam. To really “seal the deal”, use a fork to press down on the edge, crimping it beautifully and sealing it at the same time. Make sure not to pierce your little pie while doing this!
I took one look at this and though, oh yes.
This Ukrainian girl knows ALL about this shape and yes, I have made fruit perogies before! That might be something to tackle this summer once Saskatoon season is here.
Let me stress that you really need to made sure the seam is sealed or the filling will leak out. It happened to me. I was mad. I had two fried pies fall apart.
Jeanne suggests letting them rest for 5-10 minutes and take this time to heat up your oil.

In a large frying pan, heat about 1 1/5 inches of oil to about 350 degrees. I found that too much oil cooks BOTH sides at the same time, something I didn’t want to do. Once that oil is heated you are going to carefully put 2 of these in and fry the one side until it is beautifully browned. Then you will flip it and brown the other side. Too deep of oil is going to slightly cook the top. Then when you turn it over, the whole “chi” is gone. No ying and yang. No cook one side, then the other. Moral of the story is : make the oil deep enough for one side of the pie at a time.
I mixed together sugar and cinnamon to swoosh these through when I removed them from the oil. I set up a line in order to do this with the least mess.
Using a metal slotted spoon, take the browned pie from the oil.
Place on the paper towel briefly to remove oil.
Place into the sugar/coating mix, flipping to coat both sides.
Cool on the baking rack.
Now, how many the filling makes depends on how many you are making and what dough recipe. Save it and use it on top of vanilla ice cream if you have extra.

You can see below how flaky this crust is. I will be posting the crust recipe tomorrow – but I myself am going to try the No Excuses Pie Dough and see the difference.

So Happy Pie Day everyone! I would have had this post up earlier but life got in the way.
Life such as sending a bag of raw chicken breast to school with my son for his field trip lunch.
Oh yes, I did.
Grabbed the wrong bag out of the fridge.
Threw it in my son’s backpack.
Was phoned by another parent who was going on the field trip.
Listened to my son sadly, even mournfully, ask on the other parent’s phone ” Mom, why did you send me raw chicken breast for lunch?”
Decided he could take his sisters lunch from her backpack. Sister got a completely store bought lunch that didn’t even resemble real food.
Picked up my chicken breast from the teacher’s lounge fridge. Hey, it was tonight’s supper!
Have now become absent-minded parent urban legend among the school staff members.
Will never live this one down.
Love,
Next Time I’ll Send Ground Beef Magpie
Mini Apple Fried Pies
Ingredients
- 3 cups of diced Granny Smith apples
- 1/2 – 3/4 cup of water
- 1/2 cup brown sugar
- 1 1/2 tablespoons corn starch
- 1 teaspoon cinnamon
- 1/4 teaspoon salt
- dash of cloves
- dash of ginger
- 1/4 teaspoon vanilla
- 3 Pie Pastry recipes
Instructions
- To make the filling, combine everything together in a pot and place on medium-low heat on the stove. I wanted to dice my apples in nice little squares to allow for smaller pies. You also want to use a tart, sturdy apple in this.
- Start with a 1/2 cup of water as you may like your apples crisper for the end result, you can always add a little more for simmering later on. You are going to cook this mixture until the apples are the right texture for your personal taste. This took around 20 minutes for mine.
- Remove from the heat and cool.
- Prepare your dough and roll out to the usual 3 mm thickness.
- I used a 4 inch cutter for this and it was just right, a wee bit larger than bite size and not quite dessert size.
- Place a decent tablespoon of filling onto your dough circle, you have to leave 3/4 ” to 1 ” of an edge to be able to seal this properly.
- Seal the edges by folding the dough over the filling, pinching together, making sure you use a little water on your fingers to wet the seam. To really “seal the deal”, use a fork to press down on the edge, crimping it beautifully and sealing it at the same time. Make sure not to pierce your little pie while doing this!
- Let them rest for 5-10 minutes and take this time to heat up your oil.
- In a large frying pan, heat about 1 1/5 inches of oil to about 350 degrees.
- Once that oil is heated you are going to carefully put 2 of these in and fry the one side until it is beautifully browned. Then you will flip it and brown the other side.
- I mixed together sugar and cinnamon to swoosh these through when I removed them from the oil. I set up a line in order to do this with the least mess.
- Using a metal slotted spoon, take the browned pie from the oil.
- Place on the paper towel briefly to remove oil.
- Place into the sugar/coating mix, flipping to coat both sides.
- Cool on the baking rack.
Notes
Nutrition
Nutrition information is automatically calculated, so should only be used as an approximation.


Gloria thompson says
How do you make pie crust
Karlynn says
ahaaaa! Slippers! I love it!
I enjoyed the Seattle BlogHer Food…but I hate flying! How far is Austin? Oy.
Kirsten/Comfortably Domestic says
Oh my goodness, Karlynn! The chicken breast story just made my day! If it makes you feel any better, I once dropped off my (then) kindergartner at school wearing his socks and slippers. In the middle of a snowstorm. The kid walked from the car into school in them and never said a thing–until he complained to his teacher that he had wet feet.
Your fried apple pies look wonderful! I’m going to be in big trouble once I finally break down and start frying pies. As if my jiggles need any help.
I think we should all take over BlogHer Food in Austin. Just throwin’ that out there.
Karlynn says
Oh man, Mike picked up the kids from school and almost everyone who knows us asked him if he had heard what I did! Sigh. At least they know I’m a food blogger, that might give me an excuse?
These pies, my dear, are AWESOME! Thank you so much for introducing me to these. I can see more coming this summer lol!
Pssst. BlogHer Food is in Austin next year….and I’m a Texan now….
NanaBread (Jeanne) says
Yes you are. So it would be a shame if you weren’t here, wouldn’t it?
NanaBread (Jeanne) says
Poor little guy. I swear, I’m not laughing AT him, I’m laughing at YOU! That raw chicken breast story cracked me up. Especially the part where you went to school to retrieve it for dinner. That’s good stuff. Speaking of good stuff, your fried pies are SPECTACULAR!!! Why, if I didn’t know better, I’d swear you’d been frying them your entire life. It brings a tear to my Texan eye. Great job, Karlynn! I’m declaring you an Honorary Texan. Congratulations! And now I’m off to find a Sharpie so I can add horns & a goatee to my NanaBread thumbnail photo. {Insert evil laugh here.}
Edy says
Hi there!
I love this recipe and the ease all around. My question is; if I’d like to bake them instead of frying, at what temperature and how long? Thank you so much.
Good Vibration to you!